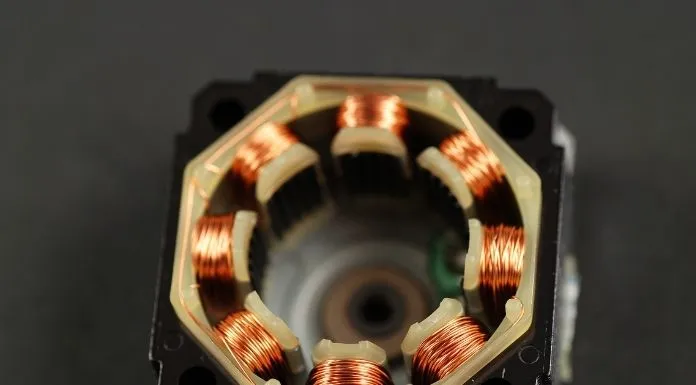
Your stator giving you trouble? A stator is a collection of wire coils that are connected to a motor in some way. If any connection is disturbed then it will
Testing a dirt bike’s stator is a simple way to prevent problems from happening and fix ones that are already happening. A multimeter makes testing a bike stator easier. Inspect wiring, thermal damage, and malfunctions before buying such tools.
If a stator’s battery reads 12 volts or higher, it’s okay. The resistance of each tab should be less than 1 ohm using a multimeter.
Magnets spinning over the stator provide energy. Know the indicators and reasons for stator failure. Electric problems are usually taken to a mechanic, but they can be fixed with a few tips and measurements of the circuit inside.
Symptoms Of A Bad Dirt Bike Stator:
The most typical symptom is that your motorcycle will either fail to exhibit any spark upon starting or will begin to run poorly.
Considering that a stator is responsible for generating the electricity necessary to start every electronic component. When it is not in good condition, it will not be able to assist a spark plug in producing fire.
This will occur when the spark plug is in use. This is one of the most fundamental signs that the stator needs to be replaced.
When the stator is unable to transmit adequate power to the spark plug, you could notice a very weak spark. This is because the spark plug is unable to fire as effectively as it did earlier.
If your dirt bike has a faulty stator, it will first begin to run more slowly and then, at some time, it will stop functioning altogether.
You will also point out that it will be difficult to start a bike with a faulty stator, which is still another warning indicator. It seems as though something is jammed in between the engine and the kickstarter, signaling that the time has come to replace the outdated stator.
While you are out riding the bike, you might notice that it is misfiring every once in a while. It is not necessary for a stator to be responsible for the same cause all of the time.
When a high-speed coil in the stator is not functioning properly, the problem will manifest itself in a variety of different ways. If you operate your bike at a lower revolutions per minute (rpm), everything will be OK; however, if you operate it at a higher rpm, it will run roughly.
The motorcycle begins to backfire, which can be caused by a number of different issues, one of which is a faulty stator; however, backfiring can also be caused by other issues.
If you experience any of these symptoms, it is imperative that you inspect the stator in your bike. It is possible to make adjustments to it, but if the issue continues to become worse, then it needs to be replaced with the.
How To Test A Dirt Bike Stator?
You can test a stator either in an off position or running position. It has been classified into two different categories: one is static, and the other is dynamic.
1. Dynamic Testing
In this testing, we measure the AC voltage between phases. This result will lie within a range for different brands of dirt bikes.
Set the multimeter at AC volts and start measuring between coils connecting the multimeter leads to the three terminals, between phase 1 & 2, phase 2 & 3 and phase 3 & 1. If the stator is good, no reading will be measured by the multimeter.
Now turn on the engine, and follow the same step as above, measure the all three terminals. Positive reading can be seen in the multimeter, dictating that the stator is fine.
Gradually increase the engine’s rpm, reading will be increased as well for all three terminals by following the same pattern.
If there will be no change in the reading of the meter, it means the stator is out of service.
2. Static Testing
In this test a few steps are included, it’s about the measurement from coil to coil and phase to ground. This result could be different for various brands of dirt bikes.
Set the multimeter at ohm and with its positive and negative poles check the stator, if it will show OL, that means the circuit is not grounded. And if it shows 0 that means the loop is closed now.
Now the next step is to do three measurements amongst three terminals in the stator circuit. Between phase 1 & 2, phase 2 & 3 and phase 3 & 1. Yamaha, Polaris or Honda stator will have a variety of results which will lie between 0.1 to 1 ohm, beyond this means something is messy.
Connect one lead of the multimeter to the ground source and the other one will be connected to any of three terminals one by one. It should be OL for an open connection.
Follow the above steps and test the dirt bike stator.
3. Voltage Testing
Check to see if the battery’s charge is so low that it no longer lets the stator work normally. Adjust the multimeter to the DC voltage setting, then measure the voltage across the posts of the battery.
Installing a battery charger is necessary if the voltage is anticipated to be lower than 12.5 Volts. The next thing you need to do is check for any signs of rust or dust around the posts or cable connections, and clean it up as quickly as you can.
Examine the cable sheathing and the cable itself to check for any signs of damage. At long last, make sure that you look over the entire battery negative to chassis connection as well as the stator to regulator connection.
4. Phenomenal Testing
Take out the stator and look at it. It’s possible that some wires got disconnected, that the thermal system got messed up, or that the insulation on the coils got bent.
Examine the connection that exists between the stator and the rotor, or consider the possibility that the magnet has been moved from its original location. These warning flags should serve as a signal for you to replace the prior stator.
These four tests should be enough to figure out how well a stator is working. If you don’t understand what you’ve read, you should talk to more experienced riders or a dirt bike mechanic.
What Causes A Stator To Fail?
There could be several reasons for the failure of any stator, but here I’m pointing out the main causes.
1. Power Overloaded
It’s possible that using all of the components at the same time will blow the electrical fuse.
If you use a device like a headlight, GPS, music, or any of the other things on the list, you will need more power.
The stator is the component that supplies the necessary power. The stator will eventually fail if it is subjected to an overload.
2. Passage Of Time
Since everyone has a cutoff point, a stator, too, will eventually reach its conclusion. Vibrations are produced when you operate a dirt bike, and riding a bicycle in any kind of weather will have an effect on the stator.
Despite this, with proper care and upkeep, the lifespan of a stator can be significantly increased. But the unfortunate truth is that it will perish at some point.
3. Major Accident
When there is a major accident, we don’t always realize that a stator may have been destroyed in the process.
Despite the fact that it is a very insignificant component, starting the bike is impossible without it.
Consequently, occurrences such as these are also capable of playing a significant role in the failure of a stator.
I’m going to bet that you’ve eliminated all of the most likely explanations for why a stator is malfunctioning.
You can put off the problem for a longer time if you don’t use all of the accessories at once, if you ride carefully to avoid accidents, and if you keep an eye on the stator by checking its condition regularly.
How To Repair A Dirt Bike Stator?
We are going to test your knowledge to determine whether or not you have the right understanding of the scenario. You are aware of the reason why your stator was damaged. However, there is one more thing that you can perform by yourself, and that is repair. You will, in fact, be able to save money while simultaneously gaining a new talent as a result of doing so.
Once you know that the stator is broken and needs to be replaced, just follow the steps below. To begin, the cost of a new stator might range anywhere from about $300 to $1500, depending on the type of stator that you decide to purchase.
1. Remove the old stator
The stator is joined to the bottom of the engine on the left-hand side. Examine what’s wrong with it after carefully removing it. Do not set fire to the stator because this could cause the three-phase windings to become shorter.
2. Separate epoxy
The subsequent step is to isolate the winding from the epoxy. Isolating the winding from the epoxy might be a challenging task; however, as soon as the epoxy has been eliminated, the winding can be taken out without any difficulty.
3. Repairing
It is going to sound strange that you need to rewind the stator, and you should file down any sharp edges that are on the stator. Invest in some fresh AWG wire, and check to see whether the copper in your bike has been enameled. You must now wound each of the three terminals individually, and if necessary, you can seek assistance from professionals.
4. Covering
In the final phase, an insulating paint will be used to cover the entire assembly, including the stator and the three winding terminals. Following the covering of the stator, place it inside the oven at a temperature of 300 degrees for at least thirty minutes.
5. Reconnection
When you are finished with the first configuration, reconnect all three connecting wires to the respective coils, and then return it to its original location. This is the point at which your bicycle is prepared to be ridden.
Make sure you have the right equipment, and watch out that you don’t get your hand too hot while you’re setting the coating inside the oven.
Note: It is conceivable that the multimeter will not always display precise measurements. This is something to keep in mind when using the device. You should check it against the measures that were previously known only for confirmation, and then you should proceed with your assignment.
Conclusion
I’m excited to tell you how well I covered the day’s topic, which was how to check a dirt bike’s stator the right way.
You found it helpful, and I have no doubt that you have found a solution to the issue by now. Sign up for our newsletter to receive updates on new posts as they become available.


